|
|
| The Build - April 2008 - March 2008 |
| |
|
| 04.21.08 - 04.25.08 - More Dye tests |
 |
- Used Simply Spray and SEM dye together.
- Looks ok - will be fine for a driver I believe
|
| |
| 04.14.08 - 04.21.08 - Using Reflectix and adding peel & seal |
 |
- Reflectix added to areas underneath rear seat
- makes huge difference for roof heat
- Peel & Seal added to floor, inside drivers side door
- fell off in hot weather - surface prep may have been bad
|
| |
| 04.07.08 - 04.14.08 - More Heat/Sound Insulation & Roof Prep |
 |
- added more layers of 'homemade LizardSkin.'
- decided to apply 6 layers on high heat areas
- trans tunnel, areas above the exhaust, firewall, maybe roof
- removed tar paper from roof
|
| |
| 04.07.08 - Unsuccessful Dye test |
 |
- Dye Test
- Process:
- clean seat with carpet shampooer
- mix fabric dye, put in spray bottle and spray onto seats
- let the dye set for at least one hour
- remove excess dye with carpet shampooer
- spray with SEM dye if needed
- initial test on seats looks ok, but feels rough
- Results:
- Dye did not take, seats looks horrible
- Simply Spray Upholstery Dye
Test
- doesn't look as good as SEM dye, but the texture is much better.
- will use Simply Spray for majority of dyeing and SEM for darkening up
|
|
| |
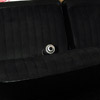
| 03.25.08 - 04.02.08 - More dyeing/arm rest base touchups |
 |
- SEM dye arrived
- much better product
- initial test on seats looks ok, but feels rough
- did not penetrate to deepest layers on fabric
- door panels and armests pads look great
- arm rest bases sanded then sprayed with mettallic paint
- seat belts dyed with fabric dye
and SEM dye
- fabric dye did not take, new belts will be purchased
|
| |
|
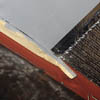
| 03.24.08 - 4.01.08 - Heat/Sound Insualtion Testing |
|
 |
- homemade 'lizard-skin' applied to section of the firewall and floor
- homemade 'lizard-skins' consists of
- 3/4 bag of ceramic spheres
- 1/2 gallon water-based primer
- 'recipe/idea' found here
- 6 heavy/thick layers applied
- peel & seal applied to sections of the floor also
- used heat gun to warm up surface of peel & seal - has good adhesion
- homemade 'lizard-skin' makes the most difference for heat reduction; peel & seal doesn't make much of a difference
- not sure if either makes much of a difference for sound reduction (too much wind noise in car right now)
|
| |
| 03.25.08 - Front end assembly/Going for a drive.... |
 |
- car back from body shop on 3/23
- re-installed front bumper, bezels (headlights, turn signals)
- took if for a drive to snap a few pics
|
| |
| 03.23.08 - Car back from body shop.. |
 |
- very little evidence of damage to roof
- overall, I'm happy with the job
|
| |
| 03.08.08 - 03.20.08 - 'Custom' under-dash gauge pod |
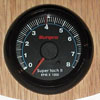 |
- made gauge pod for 2 5/8" tach, 1 1/2" water temp & 1 1/2 oil pressure
- came up with 7 different designs
- tried building it 3 times
- first time - decided oasis foam was too weak. Also only planned on 2 gauges
- second time - insulation was much better to work with, but fiberglass melted the foam
- 3rd - decided to use combination of wood, oasis foma and fiberglass
|
| |
| 03.08.08 - Testing out vinyl/carpet dye |
 |
- Decided I can't afford new door panels and arm rests right now.
- Purchase vinyl/carpet dye - the brand I bought is ok, but sprays funny
- found a 'higher quality' brand online... should be here soon
|
| |
| 02.25.08 - 03.11.08 - Assembly/Disassembly |
 |
- Driver's side and door weatherstriping installed
- trunk weatherstripping installed
- front bench seat installed (temporarily)
- noticed weird alignment issues with passenger quarter glass - not perpendicular with door
- guages hooked up (speedometer, gas, etc)
- rear window trim removed (Thanks Wade!!)
- car sent to body shop on 03.11.08
|
| |
|
|